- postman接口自动化,环境变量的用法详解——软件测试圈
在实现接口自动测试的时候,会经常遇到接口参数依赖的问题,例如调取登录接口的时候,需要先获取登录的key值,而每次请求返回的key值又是不一样的,那么这种情况下,要实现接口的自动化,就要用到postman中设置环境变量这个功能了;
在postman中,可以利用tests将接口返回的response设置为环境变量,供后续接口使用(类似参数化的概念)
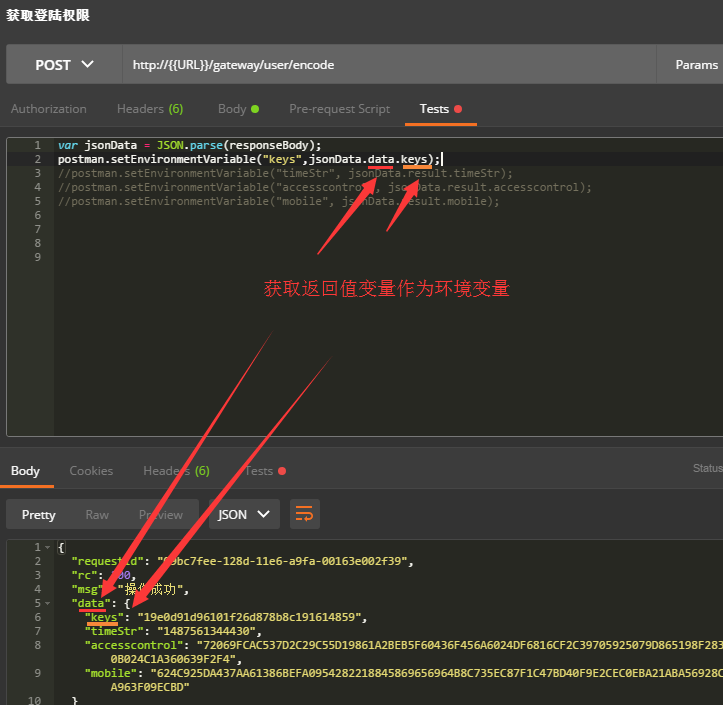
获取环境变量需要具体方法如下图所示;
var jsonData =JSON.parse(responseBody);//获取body中返回的所有参数
postman.setEnvironmentVariable("appKey",jsonData.data.appKey);//把返回参数中的keys设置为环境变量
如此就能把登录所需的key设置为环境变量,供后续登录接口的调用了;
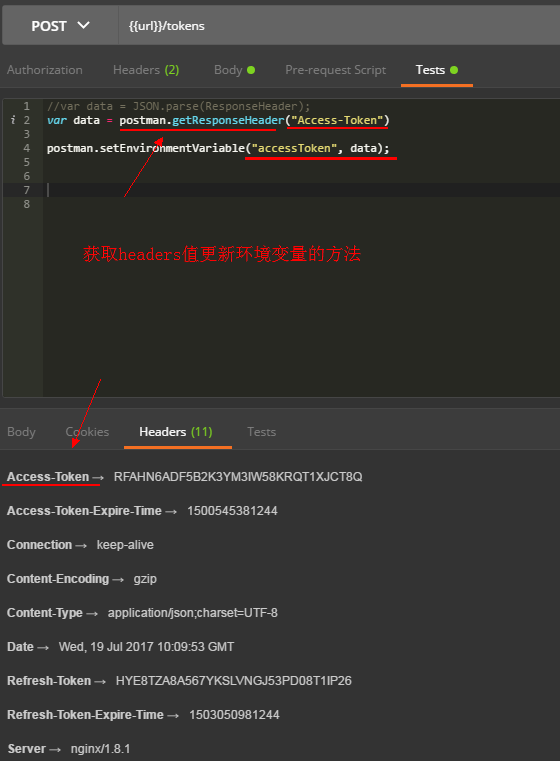
同理,获取headers值更新环境变量的方法,如下图;

postman常用方法集合:
1.设置环境变量
postman.setEnvironmentVariable("key", "value");//postman  5.0以下版本设置环境变量的方法
pm.environment.get("key", "value");//postman  5.0以上版本设置环境变量的方法
2.设置全局变量
postman.setGlobalVariable("key", "value");//postman 5.0以下版本设置全局变量方法
pm.globals.set("variable_key", "variable_value");//postman 5.0以上版本设置全局变量方法
3.检查response body中是否包含某个string
tests["Body matches string"] = responseBody.has("string_you_want_to_search");
pm.test("Body is correct", function () {
    pm.response.to.have.body("response_body_string");
});//5.0以上版本方法
4.检测JSON中的某个值是否等于预期的值
var data = JSON.parse(responseBody);
tests["Your test name"] = data.value === 100;
JSON.parse()方法,把json字符串转化为对象。parse()会进行json格式的检查是一个安全的函数。
如:检查json中某个数组元素的个数(这里检测programs的长度)
var data = JSON.parse(responseBody);
tests["program's lenght"] = data.programs.length === 5;
5.转换XML body为JSON对象
var jsonObject = xml2Json(responseBody);
tests["Body is correct"] = responseBody === "response_body_string";
6.检查response body是否与某个string相等
7.测试response Headers中的某个元素是否存在(如:Content-Type)
//getResponseHeader()方法会返回header的值,如果该值存在
tests["Content-Type is present"] = postman.getResponseHeader("Content-Type");
tests["Content-Type is present"] = responseHeaders.hasOwnProperty("Content-Type");
上面的方法,不区分大小写。下面的方法,要区分大小写。
8.验证Status code的值
tests["Status code is 200"] = responseCode.code === 200;
pm.test("Status code is 200", function () {
pm.response.to.have.status(200);
});//5.0以上版本方法
9.验证Response time是否小于某个值
tests["Response time is less than 200ms"] = responseTime < 200;
//5.0以上版本方法
pm.test("Response time is less than 200ms", function () {
    pm.expect(pm.response.responseTime).to.be.below(200);
});
10.name是否包含某个值
tests["Status code name has string"] = responseCode.name.has("Created");
//5.0以上版本方法
pm.test("Status code name has string", function () {
    pm.response.to.have.status("Created");
});
11.POST 请求的状态响应码是否是某个值
tests["Successful POST request"] = responseCode.code === 201 || responseCode.code === 202;
//5.0以上版本方法
pm.test("Successful POST request", function () {
    pm.expect(pm.response.code).to.be.oneOf([201,202]);
});
12.很小的JSON数据验证器
var schema = {
"items": {
"type": "boolean"
}
};
var data1 = [true, false];
var data2 = [true, 123];
console.log(tv4.error);
tests["Valid Data1"] = tv4.validate(data1, schema);
tests["Valid Data2"] = tv4.validate(data2, schema);
13.获取request值:
var Json = JSON.parse(request.data);
data {object}:
this is a dictionary of form data for the request. (request.data["key"]=="value")
headers {object}:
this is a dictionary of headers for the request (request.headers["key"]=="value")
method {string}:
GET/POST/PUT etc.
url {string}:
the url for the request.
假设requestBody中有"version":"1.0";这个值,如果想获取到version的value值,代码如下
var Json = JSON.parse(request.data);
var version = Json["version"];
14.JSON.parse()和JSON.stringify()
JSON.parse()【从一个字符串中解析出json对象】--把string转对象
JSON.stringify()【从一个对象中解析出字符串,主要针对[object object]类型数据的转换】--把对象转String
var data={name:'goatling'}
JSON.parse(data)
结果是: '{"name":"goatling"}'
JSON.stringify(data)
结果是:name:"goatling"
15.判断字段值是否为空typeof()
var Jsondata = JSON.parse(responseBody);
if( typeof(Jsondata.data) != "undefined" )
在pre-request和tests 中获取变量的方法:
变量可以被使用在pre-request和test script中。因为这些部分是通过JavaScript来写的
你可以以不同的方式初始化和检索这些变量。可以在脚本中初始化变量,并将它们放在特定的范围内
1.定义一个变量在脚本中
在脚本中设置一个变量可以根据变量预定的范围通过pm.environment.set("variable_key", "variable_value");方法或者pm.globals.set("variable_key", "variable_value");方法,这方法要求提供变量的key和value去设置变量。当你发送请求的时候,这脚本将会执行,值将会保存在变量中,如下图:

2.取一个预定义的变量
一旦一个变量被设置,你可以使用pm.environment.set("variable_key", "variable_value");;;或者pm.globals.set("variable_key", "variable_value");;; 根据适合的范围去获取变量值。这方法要求提供一个变量名作为参数去检索储存的值,如下图:

3.设置一个变量在作用域中
可以访问环境变量在相应的环境模板。全局变量可以广泛的访问,不管选择的作用域
作者:胖叔blog
原文链接:https://www.cnblogs.com/JHblogs/p/6418802.html
- -1.00 查看剩余0%
- 【留下美好印记】赞赏支持
- 推荐阅读
- 换一换
- 软件测试之需求管理的四个难点——软件测试圈10-18版本管理 在项目进行过程中,客户与利益相关者的一些需求变更没有办法避免。 产品负责人需要一个好的方式来管理这些需求以及变更记录。使团队成员能够清楚地了解每个发布中需要做的新特性或优化。此外,合理地重用需求还可以大大减少重复劳动,提高团队的生产率。 需求池 一个需求管理的难点就是建立需求池,并将它与业务体系相关联。当与业务使用场景结合起来时,才有价值。根据业务系统,产品负责人还可以组织对需求进行组织,从而让团队成员更好地了解需求。 变更影响 实际上,需求不仅是文字记录,还包括结构化的信息,它们之间存在着多重依赖和引用关系。改变需求会导致一系列其他需求,包括影响范围、特征、用户故事...
- 测试Leader接手新业务——软件测试圈09-13作为测试Leader接手一个新业务,怎么干?当你作为测试负责人接手了一个新业务,你可能会面临这么两个核心的问题:产品质量如何保障?QA 团队如何建设?这两个问题看似一个是职能方向,一个是业务方向,实质两者是相辅相成的。在本文中我将分享一些实践过程中的思路。整体的思路按照如下展开:01 融入环境核心原则:将自己全身心投入到一线项目,做一个好的沟通者、观察者和记录者。切忌 “新官” 上任 “三把火”,融入环境是第一要务。环境中的因素有很多,抓住“人” 与 “事”这两个核心要素。人:团队的全体成员,建立相互了解和认知的桥梁,覆盖团队中的每一位角色——开发、产品、测试、运维、设计、交互等等。怎么做?工...

- 【自动化测试】接口测试基础——软件测试圈05-131 什么是接口测试?接口测试是测试系统组件间接口的一种测试。接口测试主要用于检测外部系统与系统之间以及内部各个子系统之间的交互点。测试的重点是要检查数据的交换、传递和控制管理过程,以及系统间的相互逻辑依赖关系等。1.1 什么是接口?接口是一种用来定义程序的协议,是一组规则的集合。它规定了实现本接口的类,或接口必须拥有的一组规则。1.1.1 为什么需要接口?接口的意义在于抽象,从而使同类事物在同一高度具有通用及可替代性。在系统分析和架构中,分清层次和依赖关系,每个层次不是直接向其上层提供服务(即不是直接实例化在上层中),而是通过定义一组接口,仅向上层暴露其接口功能,上层对于下层仅仅是接口依赖,而...

- 测试一个新功能时,最重要的一个步骤就是编写测试用例,测试用例写好了,那么后面的测试工作基本就非常顺利了,那么作为一个职场新人来说,怎样提高测试用例的质量呢? 充分理解需求 作为一个新人来说,对所做项目并没有太深入的了解,那么拿到测试需求后,不应该拿到什么就是什么,需求上怎么写就怎么做,要有自己的见解。 举个例子来说,某个网站年终大促,要搞个优惠活动,有两种优惠方式: 第一种是店铺自己发的优惠,两件8折、3件7折; 另一种是平台提供的优惠,满100-10、200-30。 测试人员A拿到这个需求后,发现非常简单,迅速的就将测试用例编写完了,如下: 乍一看是没有问题的,所有情况也都...

-
- 接着《深聊性能测试之:Locust性能自动化代码实战(一)》,我们继续第二部分的分享:4. Locust高级用法4.1 关联做过接口或者爬虫的的大佬都知道,传参是必不可少的,而常见的场景有session_id。对于返回的html页面,可用采用lxml库来定位获取需要的参数。我们先上代码# -*- coding: utf-8 -*- """ @ auth : carl_DJ @ time : 2022-07-23 """ from&nbs...

-
- 关于我们 联系我们 版权声明 广告服务 站长统计
- 建议使用IE 11.0以上浏览器,800×600以上分辨率,法律顾问:上海兰迪律师事务所 项棋律师
- 版权所有 上海博为峰软件技术股份有限公司 Copyright©51testing.com 2003-2024, 沪ICP备05003035号
- 投诉及意见反馈:webmaster@51testing.com; 业务联系:service@51testing.com021-64471599-8017

- 51testing软件测试圈微信


