 12
12 12
12


- 【Linux】基础知识,常用命令,该有的都有——软件测试圈
1. linux目录与文件
Windows: 以多根的方式组织文件 C:\ D:\ E:
Linux: 以单根的方式组织文件 /
[root@c7-4 /]# ls
bin  boot  dev  etc  home  lib  lib64  media  mnt  opt  proc  root  run  sbin  srv  sys  tmp  usr  var
[root@c7-4 /]#
根下的目录解析:
| 目录 | 目录 |
| root | root用户的HOME |
| home | 存储普通用户家目录 |
| dev | 设备文件 /dev/sda,/dev/tty,/dev/pts/1, /dev/zero, /dev/null, /dev/random |
| proc | 虚拟的文件系统,反映出来的是内核,进程信息或实时状态,只存在于内存中,大小为0,du -sh /proc |
| bin | 普通用户使用的命令 |
| sbin | 管理员使用的命令 |
| /usr/bin | 普通用户使用的应用程序 |
| /usr/sbin | 管理员使用的应用程序 |
| /usr/local | 软件安装目录,相当于C:\Program |
| boot | 存放的系统启动相关的文件,例如kernel,grub(引导装载程序) |
| etc | 配置文件(系统相关如网络/etc/sysconfig/network-scripts) |
| tmp | 临时文件(主要是程序产生的临时数据) |
| /var/log | 日志文件 |
1.1 关于目录与文件的操作方式
目录管理——创建、复制、删除、移动、查看、编辑、压缩、查找
| 命令 | 结果 |
| ls | 列示当前目录下的所有内容 |
| cd | 切换目录,后面加路径,直接回车是回家,俩点是上级目录 |
| mkdir | 创建目录 |
| pwd | 显示目前的目录 |
| rmdir | 删除一个空的目录 |
| cp | 复制文件或目录 |
| rm | 移除文件或目录 |
| mv | 移动文件与目录,或修改文件与目录的名称 |
| touch | 创建文件 |
| cat | 查看文件内容 |
| less | 按页翻 空白键/[pagedown]/[pageup]/ “/字串”(查找)/n /N /q |
| more | 按页翻动文件,空格/回车/q/b/:f/ ”/字符串"(查找) |
| head | 查看文件前n项 head -n |
| tail | 倒叙查看文件内容 -n 查看几行, -f 动态查看 |
| nano | 文件编辑 |
| find | 查找文件 find / -name $file |
1.2 符号链接
软链接只是用链接后的文件作为一个指向源文件的路径,链接后的文件是一个新文件,每个文件之间的inode不相同,软连接后的文件的权限都是777,大小是源文件的路径的字符个数。软连接的源文件不可以剪切删除和重命名,对文件做符号链接 (前面是源文件 后面是链接)
# ln -s file222.txt /boot/ruan.txt
对目录做符号链接
# ln -s /dir1/ /dir2
删除目录软链接
# rm -rf /dir2/            删除目录下的文件
# unlink /dir2              删除链接文件
硬链接是多个文件名对应到同一个inode;故硬链接的文件和源文件的inode,权限,属主,属组,时间,类型…都一样,硬链接的源文件可以剪切删除重命名
对文件做硬链接(前面是源文件 后面是链接)
# ln /file111.txt /etc/
# ln file111.txt /etc/h-111.txt
# ln /file111.txt /boot/
# ln: 创建硬链接"/boot/file222.txt" => "/file222.txt": 无效的跨设备连接
对目录做硬链接
# ln dir111/ /boot/
# ln: "dir111/": 不允许将硬链接指向目录
2 存储操作
2.1一般存储操作
| 命令 | 结果 |
| lsblk | 列示当前磁盘设备及挂载情况 |
| fdisk | MBR 分区表,创建分区 |
| gdisk | GPT分区表,创建分区 |
| mkfs | 格式化:mkfs.ext4 /dev/sdb1 |
| mount | 临时挂载,mount /dev/sdb1 /mnt,永久挂载写在/etc/fstab中 |
| umount | 卸载:umount /dev/sdb1 |
| blkid | 查看设备得uuid |
| df | 查看文件系统使用情况:df -h |
2.2 逻辑卷管理
| 命令 | 创建 | 显示详情 | 显示 | 扩展 | 缩小 | 删除 |
| 物理卷 | pvcreate | pvdisplay | pvs | pvremove | ||
| 卷组 | vgcreate | vgdisplay | vgs | vgextend | vgreduce | vgremove |
| 逻辑卷 | lvcreate | lvdisplay | lvs | lvextend | lvreduce | lvremove |
EXT2/3/4文件系统扩展:
# resize2fs /dev/vg02/lv02
# df -Th
XFS文件系统扩展:
# xfs_growfs /dev/vg1/lv2
# df -Th
如果磁盘无法正常使用,请使用如下命令查看具体错误:
#dmesg -T | grep -i io
3 用户管理
3.1 用户管理操作命令
| 命令 | 参数 | 内容 | 用户名 |
| useradd | -u | uid | |
| … | -d | 家目录 | |
| … | -s | shell类型 /bin/bash登陆或者/sbin/noligin不登陆 | |
| … | -M | 不跟东西,没有家得意思 | |
| … | -g | 组名,用来指定组 | |
| … | -G | 组名1,组名2 用来指定附加组 |
| 命令 | 参数 | 内容 | 组名 |
| groupadd | -g | gid | 组名 |
| 命令 | 参数 | 内容 | 组名 |
| groupdel | -g | gid | 组名 |
| 命令 | 参数 | 内容 | 用户名 |
| usermod | -u | uid修改uid | |
| … | -G | 组名1,组名2 修改附加组,覆盖 | |
| … | -aG | 组名1,组名2 修改附加组,追加 | |
| … | -g | 组名改主组 | |
| … | -s | shell类型 修改shell类型 |
3.2 sudo提权
将普通用户提升为root
# vim /etc/sudoers
%wheel  ALL=(ALL)       NOPASSWD: ALL
注释:
%wheel表示组,用户需要添加到这个组,作为附加组
lily,没有%表示用户,用户可以直接使用sudo工具
# sudo useradd gougou10
查看用户id
# id gougou10
# uid=505(gougou10) gid=505(gougou10) 组=505(gougou10)
4. 文件权限
| 属主权限 | 属组权限 | 其他人权限 | 属主 | 属组 | 文件名 |
| rwx | rw- | r– | star | hr | file1 |
[root@192 ~]# ll
total 8
lrwxrwxrwx. 1 root root  6 Oct 25 03:31 file11 -> file22
-rw-r--r--. 1 root root 18 Oct 25 03:34 file111.txt
-rw-r--r--. 1 root root 25 Oct 25 03:29 file22
drwxr-xr-x. 2 root root 25 Oct 25 03:38 zhang
4.1 更改文件得属主/属组
==chown:
[root@192 ~]# chown alice.hrfile1   //改属主、属组
[root@192 ~]# chown alice      file1    //只改属主
[root@192 ~]# chown        .hr file1//只改属组
[root@192 ~]# chown -R alice.hrdir1
=chgrp:
[root@192 ~]# chgrp it file1 //改文件属组
[root@192 ~]# chgrp -R it dir1 //递归改属组
4.2 更改文件得权限
==使用符号
| 命令 | 对象 | 赋值符 | 权限类型 | 文件 |
| … | u | + | r | file |
| chmod | g | - | w | file |
| … | o | = | x | file |
[root@192 ~]# chmod u+x file1   //属主增加执行
[root@192 ~]# chmod a=rwx file1   //所有人等于读写执行
[root@192 ~]# chmod a=- file1   //所有人没有权限
[root@192 ~]# chmod ug=rw,o=r file1   //属主属组等于读写,其他人只读
[root@192 ~]# ll file1  //以长模式方式查看文件权限
-rw-rw-r-- 1 star it 17 10-25 16:45 file1     //显示的结果
== 使用数字
[root@192 ~]# chmod 644 file1
[root@192 ~]# ll file1
-rw-r--r-- 1 star it 17 10-25 16:45 file1
5. 软件包管理
5.1 使用YUM管理RPM包
自动解决包的依赖关系
==查看可用仓库
# yum clean all                               //清空缓存及其它文
# yum makecache                             //重建缓存
# yum repolist all                              //查询可用的仓库
==安装软件包
# yum -y install httpd vsftpd
# yum -y reinstall httpd            //重新安装
# yum -y update httpd             //更新
# yum -y install php
# yum -y update                     //更新整个系统所有软件包
# yum -y groupinstall mariadb   //安装软件包组,一组里面可以包含多个软件
==查询(从本地 rpm数据库 和 yum源 中查询)
# yum list httpd
# yum list *vnc*
# yum list |grep vnc
# yum list installed
# yum info httpd
==卸载
# yum -y remove mariadb1
==history
# yum history
# yum history info 4
# yum history undo 4
扩展查询:
查找vsftpd.conf属由哪个包提供?
# yum provides *vsftpd/vsftpd.conf
按照关键字搜索,软件名字中含有chinese或者是描述信息中含有chinese都会显示出来
[root@server ~]# yum search chinese
5.2 使用RPM工具管理RPM包
需要手动解决包的依赖关系
==安装
# rpm -ivh local_path
# rpm -ivh url_path
# rpm -ivh dos2unix-3.1-37.el6.x86_64.rpm 套件名
-i  安装
-v 显示过程
-h 显示百分比
--force    //强制安装软件包
--nodeps        //忽略依赖关系
# rpm -ivh ntfs-3g-2013.1.13-5.el7.x86_64.rpm
error: Failed dependencies:
libc.so.6(GLIBC_2.14)(64bit) is needed by ntfs-3g-2:2013.1.13-5.el7.x86_64
==查询
(rpm数据库中记录的是已经安装过的包的信息,需要使用包的全名ntfs-3g)
# rpm -q ntfs-3g//查询指定包是否安装
# rpm -qa |grep ntfs
# rpm -qf /usr/bin/ntfs-3g     //查询该文件属于哪个rpm包
# rpm -qc ntfs-3g    //查询某个包安装的配置文件
==卸载
# rpm -e ntfs-3g
# rpm -e ntfs-3g --nodeps
5.3 源码包安装
一、获得源码包途径
官方网站,可以获得最新的软件包
二、安装源码包
准备工作
编译环境如gcc、gcc-c++编译器、make
准备软件 nginx-1.4.4.tar.gz
部署Nginx
# tar xvf nginx-1.4.4.tar.gz -C /usr/local/src/
# make                                                  //将源码包编译成二进制的形式
# make install                                         //安装编成的二进制的nginx
# /usr/local/nginx/sbin/nginx//启动nginx服务器
6.打包压缩
6.1,tar命令
==打包(归档),压缩
c即create创建,f打包后的文件名
# tar -czf etc1.tar.gz /etc    //-z 调用gzip工具进行压缩
# tar -cjf etc2.tar.bz2 /etc//-j  调用bzip2工具进行压缩
# tar -cJf etc3.tar.xz /etc    //-J  调用xz工具进行压缩
# ll -h etc*
-rw-r--r--. 1 root root 8.7M 3月  12 00:08 etc1.tar.gz
-rw-r--r--. 1 root root 7.5M 3月  12 00:08 etc2.tar.bz2
-rw-r--r--. 1 root root 4.8M 3月  12 00:09 etc3.tar.xz
==查询
# file a.txt.gz
a.txt.gz: gzip compressed data, was "a.txt", from Unix, last modified: Wed Nov  8 15:23:10 2017
tar -ztvf etc1.tar.gz         //查询gzip压缩的文件
# tar -jtvf etc2.tar.bz2        //查询bzip2压缩的文件
# tar -Jtvf etc3.tar.xz         //查询xz压缩的文件
==解压,解包
# tar -xzvf etc1.tar.gz    //x解包
# tar -xvf etc1.tar.gz    //无需指定解压工具,tar会自动判断
# tar -xvf etc2.tar.bz2  -C /tmp            //-C重定向到//tmp目录
# tar xf etc3.tar.xz
==解压zip
# yum -y install unzip
# unzip xxx.zip
7. 进程管理
7.1 查看进程
==静态ps
# ps aux
USER       PID %CPU %MEM    VSZ   RSS TTY     STAT START   TIME COMMAND
root         1     0.0     0.0          2164   648 ?          Ss   08:47     0:00  /usr/lib/systemd/systemd
USER: 运行进程的用户
PID: 进程ID
%CPU: CPU占用率
%MEM: 内存占用率
VSZ: 占用虚拟内存,包括程序、代码、共享库等所有的
RSS: 占用实际内存 驻留内存
TTY: 进程运行的终端,?表示不依赖于任何的终端
STAT: 进程状态
R 运行
S 可中断睡眠 Sleep
D 不可中断睡眠
T 停止的进程
Z 僵尸进程
X 死掉的进程
START: 进程的启动时间
TIME: 进程占用CPU的总时间,单位是minute
COMMAND: 进程文件,进程名
==动态top(查看、管理进程)
# top
# top -d 1                一秒钟变化一次
top - 14:22:36 up  4:45,  3 users,  load average: 0.00, 0.00, 0.00
Tasks: 206 total,   2 running, 204 sleeping,   0 stopped,   0 zombie
Cpu(s):  1.6%us,  0.7%sy,  0.0%ni, 96.8%id,  0.9%wa,  0.0%hi,  0.0%si,  0.0%st
Mem:   4019424k total,  1327584k used,  2691840k free,   131012k buffers
Swap:  2047992k total,        0k used,  2047992k free,   650880k cached
load average: 0.23, 0.06, 0.02 1分钟,5分钟,15分钟之内系统的平均负载
us:用户占用的cpu的百分比 sy:内核占用的cpu的百分比 ni 改变过优先级的进程占用的cpu的百分比
id:cpu的空闲时间 wa:cpu的IO等待的时间 hi:硬中断占用的cpu的百分比 si:软中断
st:cpu被偷走的时间
第二部分:进程信息
命令
h或?获得帮助
M 按内存的使用排序
P 按CPU使用排序
N 以PID的大小排序
R 对排序进行反转
1 显示所有CPU的负载
==查看网络进程
ports and services
网络服务是通过socket的方式提供服务的,使用ss命令查询常用的选项
[root@www ~]# ss --help
-n 不解析服务的名字
-a 显示所有套接字
-l 显示监听(Listen)的端口
-t 显示tcp的套接字或者是服务
-u 显示udp的套接字或者是服务
-p 显示进程的名字
1、Show TCP sockets(LISTEN)
[root@www ~]# ss -ant           //查看所有状态的,包括监听和建立连接的,此时无需l 选项。
[root@www ~]# ss -ant |grep :22
2、Show UDP sockets(所有状态)
udp的协议比较少
[root@www ~]# ss -anu
注意:netstat命令的用法和ss的用法相同
==其他查看进程方式
[root@aliyun ~]# pstree -p
[root@aliyun ~]# atop
[root@aliyun ~]# htop
[root@aliyun ~]# pgrep  -l sshd
[root@aliyun ~]# lsof  file1    显示文件或者目录哪个进程在使用
7.2 进程控制
==shell管理进程
# kill -l//列出所有支持的信号
编号 信号名
1) SIGHUP     重新加载配置
2) SIGINT    键盘中断^C
9) SIGKILL    强制终止,不可忽略,不可拦截
15) SIGTERM    终止(正常退出,干净)默认信号,可忽略
18) SIGCONT    继续,不可拦截
19) SIGSTOP    停止,不可忽略
20)SIGTSTP          暂停^Z
==给sshd进程发送1信号
# ps aux |grep sshd
root      1925  0.0  0.0  64116    44 ?        Ss   Jul25   0:00 /usr/sbin/sshd
# kill -1 1925
# ps aux |grep sshd
root     32701  0.0  0.2  64116  1144 ?        Ss   19:27   0:00 /usr/sbin/sshd
==给vim进程发送9,15信号
# touch file1 file2
# tty
/dev/pts/1
# vim file1
# tty
/dev/pts/2
# vim file2
# ps aux |grep vim
root      4362  0.0  0.2  11104  2888 pts/1    S+   23:02   0:00 vim file1
root      4363  0.1  0.2  11068  2948 pts/2    S+   23:02   0:00 vim file2
# kill 4362
# kill -9 4363
==给sshd进程发送18,19信号
# ps aux |grep sshd
root      5571  0.0  0.0  64064  1164 ?        Ss   09:35   0:00 /usr/sbin/sshd
# kill -STOP 5571
# ps aux |grep sshd
root      5571  0.0  0.0  64064  1164 ?        Ts   09:35   0:00 /usr/sbin/sshd
# kill -cont 5571
# ps aux |grep sshd
root      5571  0.0  0.0  64064  1164 ?        Ss   09:35   0:00 /usr/sbin/sshd
当sshd进程被终止了,需要使用下面命令把它启动起来
[root@localhost ~]# systemctl start sshd
start:启动
stop:停止
status:查看状态
restart:重新启动
reload:重新加载,不是所有的服务都支持这个用法的123456
killall命令
# killall vim//给所有vim进程发送15信号
# pkill -t pts/3       //只是杀掉终端上的进程
# pkill -9 -t pts/3   //连终端都一起杀掉了
8. Linux dmidecode 命令,查看硬件信息
dmidecode 用于获取主机的硬件信息,通常是在不打开计算机机箱的情况下使用该命令来查找硬件详细信息,常见用法如下:
==打印所有得硬件信息
[root@localhost ~]$ dmidecode                          # 打印所有硬件信息
[root@localhost ~]$ dmidecode -q                       # 打印所有硬件信息,比较简洁
[root@localhost ~]$ dmidecode | grep 'Product Name'    # 以过滤的方式来查看指定的硬件信息
-t/-type 查看相关类型得硬件信息
[root@localhost ~]$ dmidecode --type bios              # 查看BIOS相关的硬件信息
[root@localhost ~]$ dmidecode --type system            # 查看系统相关的硬件信息
[root@localhost ~]$ dmidecode --type baseboard         # 查看主板相关的硬件信息
[root@localhost ~]$ dmidecode --type chassis           # 查看机箱相关的硬件信息
[root@localhost ~]$ dmidecode --type processor         # 查看处理器相关的硬件信息
[root@localhost ~]$ dmidecode --type memory            # 查看内存相关的硬件信息
等同于
[root@localhost ~]$ dmidecode -t 0           # 查看BIOS相关的硬件信息
全部类型
Type Information
0 BIOS
1 System
2 Base Board
3 Chassis
4 Processor
5 Memory Controller
6 Memory Module
7 Cache
8 Port Connector
9 System Slots
10 On Board Devices
11 OEM Strings
12 System Configuration Options
13 BIOS Language
14 Group Associations
15 System Event Log
16 Physical Memory Array
17 Memory Device
18 32-bit Memory Error
19 Memory Array Mapped Address
20 Memory Device Mapped Address
21 Built-in Pointing Device
22 Portable Battery
23 System Reset
24 Hardware Security
25 System Power Controls
26 Voltage Probe
27 Cooling Device
28 Temperature Probe
29 Electrical Current Probe
30 Out-of-band Remote Access
31 Boot Integrity Services
32 System Boot
33 64-bit Memory Error
34 Management Device
35 Management Device Component
36 Management Device Threshold Data
37 Memory Channel
38 IPMI Device
39 Power Supply
-s (–string keyword)支持的keyword包括:
[root@localhost ~]$ dmidecode -s system-serial-number
VMware-56 4d 9d 1e a4 f5 ee c7-6e 0e 6e 2b 71 5b ce c7
##可加参数
bios-vendor,
bios-version,
bios-release-date,
system-manufacturer,
system-product-name,
system-version,
system-serial-number,
baseboard-manu-facturer,
baseboard-product-name,
baseboard-version,
baseboard-serial-number,
baseboard-asset-tag,
chassis-manufacturer,
chas-sis-version,
chassis-serial-number,
chassis-asset-tag,
processor-manufacturer,
processor-version.
作者:zxllstar
原文链接:https://blog.csdn.net/weixin_45629044/article/details/109254376#comments_13997589
- 0.00 查看剩余0%
- 【留下美好印记】赞赏支持
热门文章
最新讲堂
- 推荐阅读
- 换一换
- 尝试用金字塔原理来沟通08-07世界上最遥远的距离不是我说还是没说,而是我说了什么你却没明白是怎么回事。 最近小编有幸参加了一场金字塔原理的培训课程,金字塔原理帮助我们解决两大问题:思维混乱、逻辑不清,通过金字塔的学习,可以做到想清楚、说明白。下边小编通过小明的故事,跟大家分享一下金字塔原理的工作的方式。 一天,小明在电梯里遇到了部门领导,领导问:小明,好久不见,最近在忙什么? 小明瞬间脑袋空白,不知道如何回答,支支吾吾的说:还好,没忙什么,就是在做5.0版本的项目测试。 小明不开心的回到工位,看到了群群,群群帮他分忧,群群说:小明,你可以采用时间逻辑进行回答,比如我上个月在做一个创新项目升级策略的工具,这个月刚...
- 1.同一个手机号申请一个产品在后台查看借款订单信息同一时间内有两条订单信息。 这个问题在测试过程中是随机出现的,在我的测试手机上出现的概率相对比较大,但在Android开发手机上复现的概率较低,开发难以定位,我猜测可能是短时间内多次触发了APP的提交按钮,导致该问题出现。最后建议后端开发加了一个限制,短时间内多次点击提交按钮,后台只显示第一条提交信息,且后期再没发现这个问题。 2.专题详情页,当后台配置的RGB值为(99,99,90)。在Android&IOS APP上查看专题详情,专题摘要显示不出来(数据是有的,此RGB周围的值和字体颜色相似)。 (1)该问题不应该是bug...

-
- 软件测试的类型-安全测试&其他类型的测试(1)08-01安全测试这是一种由特殊团队执行的测试。任何黑客方法都可以渗透系统。进行安全测试以检查软件、应用程序或网站如何免受内部和/或外部威胁。该测试包括有多少软件可以抵御恶意程序、病毒以及授权和身份验证过程的安全性和强度。它还检查软件对任何黑客攻击和恶意程序的行为,以及在此类黑客攻击后如何维护软件以确保数据安全。a) 渗透测试渗透测试或渗透测试是作为对系统的授权网络攻击执行的安全测试类型,以找出系统在安全方面的弱点。渗透测试由外部承包商执行,通常称为道德黑客。这就是为什么它也被称为道德黑客。承包商执行不同的操作,如 SQL 注入、URL 操作、特权提升、会话到期,并向组织提供报告。注意:不要在您的笔记本...
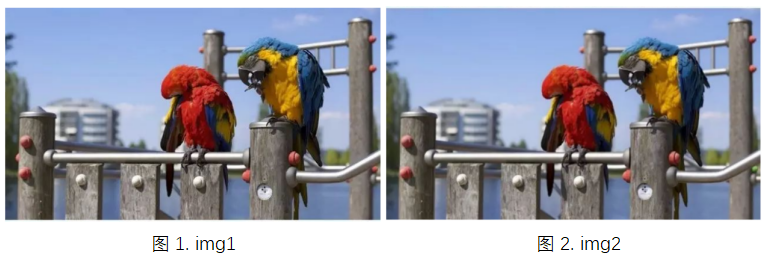
- 在ui自动化测试领域,会遇到这样的情形:发布一张图片或上传一个头像,如何通过自动化测试的方式判定发布后的图片是否正确呢?又或者,我们如何通过自动化测试的方式判定某网页的某个logo是否与预期的一致呢?也许,你会想,要是能够自动比对图片,将差异化的点在图片上圈出来就好了。相信我,只要你想,就会有。 试想一下,上述情形,像不像我们常玩的“一起来找茬”呢?让我们以具体案例展示如何以自动化的方式“找茬”。 如下所示,图1、图2是我们两张相似图片(暂定图1名为img1,图2名为img2)。我们以图1、图2为例,使用自动化的方法找出两张图片中差异之处。 方案设计 对于比较图片差异性,我们经常使...
-
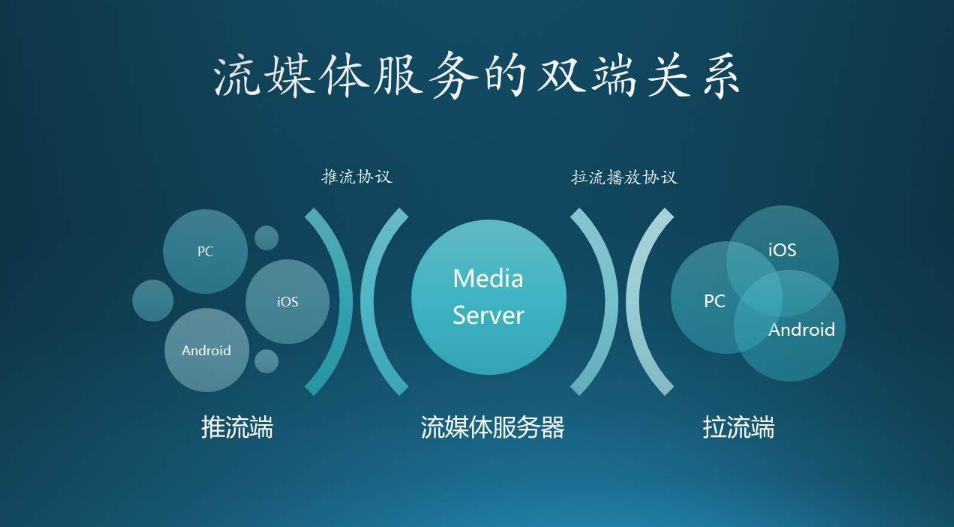
- 视频直播平台性能测试——软件测试圈03-011、测试背景 随着直播业务的兴起,越来越多的直播平台开始涌现,这火热的程度好像一个应用不带上直播业务出来都不好意思跟人打招呼。 公司也在赶时髦,做了一个直播平台,直播内容是面向公司内部员工的,还有少量外部用户。直播平台好不好,最重要的一点是观众观看是否流畅是否清晰,能否满足较多的人观看。平台需要进行测试是否满足大量用户观看直播,这么重要的事情当然要交给性能测试人员来做。2、直播技术 一般来说,我们常把视频直播的流程可以分为如下几步:&nbs...


。在Android&IOS APP上查看专题详情,专题摘要显示不出来(数据是有的,此RGB周围的值和字体颜色相似)。 (1)该问题不应该是bug...&url=http://quan.51testing.com/pcQuan/pages/artDetails.html?artId=146945&content=utf-8&sourceUrl=http://quan.51testing.com/pcQuan/pages/artDetails.html?artId=146945&pic=http://quan.51testing.com/ueditor/php/upload/image/20240429/1714357254349098.png)
。我们以图1、图2为例,使用自动化的方法找出两张图片中差异之处。 方案设计 对于比较图片差异性,我们经常使...&url=http://quan.51testing.com/pcQuan/pages/artDetails.html?artId=146876&content=utf-8&sourceUrl=http://quan.51testing.com/pcQuan/pages/artDetails.html?artId=146876&pic=http://quan.51testing.com/ueditor/php/upload/image/20240326/1711420751398945.png)
- 关于我们 联系我们 版权声明 广告服务 站长统计
- 建议使用IE 11.0以上浏览器,800×600以上分辨率,法律顾问:上海兰迪律师事务所 项棋律师
- 版权所有 上海博为峰软件技术股份有限公司 Copyright©51testing.com 2003-2024, 沪ICP备05003035号
- 投诉及意见反馈:webmaster@51testing.com; 业务联系:service@51testing.com021-64471599-8017

- 51testing软件测试圈微信