 11
11 12
12


- Pytest自动化测试 - 简易教程
简介
pytest是动态编程语言Python专用的测试框架,它具有易于上手、功能强大、可扩展性好、兼容性强、效率高、第三方插件丰富等特点。
功能特征:
完整的文档,包括安装,教程和PDF文档
简单而又详细的断言模式(使用纯assert语句)
自动发现测试模块和功能(以test为标识)
可以运行unittest和nose框架的测试用例
灵活的固件,用于管理小型或参数化的长期测试资源
丰富的插件架构,拥有三百多个外部插件和丰富的社区
编写规则:
测试文件以test_开头(以_test结尾也可以)
测试类以Test开头,并且不能带有 init 方法
测试函数以test_开头
断言使用基本的assert即可
自动发现规则:
如果未指定任何参数,则从testpaths(如果已配置)或当前目录开始收集。
另外,命令行参数可以在目录、文件名或节点ID的任何组合中使用。
在这些目录中,搜索包含 test_*.py 或 *_test.py 的测试文件。
从这些文件中,收集以test前缀的测试方法,或者在Test前缀的测试类(无__init__方法)中的以test前缀的测试方法。
官方文档:https://docs.pytest.org/en/latest/contents.html
安装
打开bash命令行,运行以下命令:
pip install -U pytest
检查是否安装了正确的版本:
$ pytest --version
pytest 6.1.2
示例
创建一个简单的测试函数:
# test_sample.py
# 被测功能
def func(x):
    return x + 1
# 测试成功
def test_pass():
    assert func(3) == 4
# 测试失败
def test_fail():
    assert func(3) == 5
现在开始执行测试功能:
E:\workspace-py\Pytest>pytest
========================================================================== test session starts ==========================================================================
platform win32 -- Python 3.7.3, pytest-6.0.2, py-1.9.0, pluggy-0.13.0
rootdir: E:\workspace-py\Pytest
plugins: allure-pytest-2.8.18, cov-2.10.1, html-2.1.1, metadata-1.8.0, rerunfailures-9.1, xdist-2.1.0
collected 2 items
test_sample.py .F                                                                                                                                                  [100%]
=============================================================================== FAILURES ================================================================================
_______________________________________________________________________________ test_fail _______________________________________________________________________________
    def test_fail():
>       assert func(3) == 5
E       assert 4 == 5
E        +  where 4 = func(3)
test_sample.py:16: AssertionError
======================================================================== short test summary info ========================================================================
FAILED test_sample.py::test_fail - assert 4 == 5
====================================================================== 1 failed, 1 passed in 0.16s ======================================================================
这里未指定测试用例,pytest将依据自动发现规则检索并执行测试,等同于 pytest ./test_sample.py
pytest 使用 . 标识测试成功(PASSED)
pytest 使用 F 标识测试失败(FAILED)
可以使用 -v 选项,显示测试的详细信息
可以使用 -h 查看 pytest 的所有选项
标记
默认情况下,pytest 会递归查找当前目录下所有以 test 开始或结尾的 Python 脚本,并执行文件内的所有以 test 开始或结束的函数和方法。
1、如果你想指定运行测试用例,可以通过 :: 显式标记(文件名:: 类名::方法名)。
E:\workspace-py\Pytest>pytest test_sample.py::test_pass
========================================================================== test session starts ==========================================================================
platform win32 -- Python 3.7.3, pytest-6.0.2, py-1.9.0, pluggy-0.13.0
rootdir: E:\workspace-py\Pytest
plugins: allure-pytest-2.8.18, cov-2.10.1, html-2.1.1, metadata-1.8.0, rerunfailures-9.1, xdist-2.1.0
collected 1 item
test_sample.py .                                                                                                                                                   [100%]
=========================================================================== 1 passed in 0.05s ===========================================================================
2、如果你想选择一些测试用例,可以使用 -k 模糊匹配。
E:\workspace-py\Pytest>pytest -k pass test_sample.py
========================================================================== test session starts ==========================================================================
platform win32 -- Python 3.7.3, pytest-6.0.2, py-1.9.0, pluggy-0.13.0
rootdir: E:\workspace-py\Pytest
plugins: allure-pytest-2.8.18, cov-2.10.1, html-2.1.1, metadata-1.8.0, rerunfailures-9.1, xdist-2.1.0
collected 2 items / 1 deselected / 1 selected
test_sample.py .                                                                                                                                                   [100%]
==================================================================== 1 passed, 1 deselected in 0.02s ====================================================================
3、如果你想跳过个别测试用例,可以使用 pytest.mark.skip(),或者 pytest.mark.skipif(条件表达式)。
# 测试失败
@pytest.mark.skip()
def test_fail():
    assert func(3) == 5
复制代码
E:\workspace-py\Pytest>pytest -v test_sample.py
========================================================================== test session starts ==========================================================================
platform win32 -- Python 3.7.3, pytest-6.0.2, py-1.9.0, pluggy-0.13.0 -- c:\python37\python.exe
cachedir: .pytest_cache
metadata: {'Python': '3.7.3', 'Platform': 'Windows-7-6.1.7601-SP1', 'Packages': {'pytest': '6.0.2', 'py': '1.9.0', 'pluggy': '0.13.0'}, 'Plugins': {'allure-pytest': '2.8.
18', 'cov': '2.10.1', 'html': '2.1.1', 'metadata': '1.8.0', 'rerunfailures': '9.1', 'xdist': '2.1.0'}}
rootdir: E:\workspace-py\Pytest
plugins: allure-pytest-2.8.18, cov-2.10.1, html-2.1.1, metadata-1.8.0, rerunfailures-9.1, xdist-2.1.0
collected 2 items
test_sample.py::test_pass PASSED                                                                                                                                   [ 50%]
test_sample.py::test_fail SKIPPED                                                                                                                                  [100%]
===================================================================== 1 passed, 1 skipped in 0.07s ======================================================================
4、如果你想捕捉一些异常,可以使用pytest.raises()。
# test_raises.py
def test_raises():
    with pytest.raises(TypeError) as e:
        connect('localhost', '6379')
    exec_msg = e.value.args[0]
    assert exec_msg == 'port type must be int'
5、如果你事先知道测试函数会执行失败,但又不想直接跳过,而是希望显示的提示,可以使用pytest.mark.xfail()。
# 测试失败
@pytest.mark.xfail()
def test_fail():
    assert func(3) == 5
E:\workspace-py\Pytest>pytest -k fail test_sample.py
========================================================================== test session starts ==========================================================================
platform win32 -- Python 3.7.3, pytest-6.0.2, py-1.9.0, pluggy-0.13.0
rootdir: E:\workspace-py\Pytest
plugins: allure-pytest-2.8.18, cov-2.10.1, html-2.1.1, metadata-1.8.0, rerunfailures-9.1, xdist-2.1.0
collected 2 items / 1 deselected / 1 selected
test_sample.py x                                                                                                                                                   [100%]
=================================================================== 1 deselected, 1 xfailed in 0.05s ====================================================================
6、如果你想对某个测试点进行多组数据测试,可以使用 pytest.mark.parametrize(argnames, argvalues) 参数化测试,即每组参数都独立执行一次测试。
注意:以往我们可以把这些参数写在测试函数内部进行遍历,但是当某组参数导致断言失败,测试则就终止了。
# 测试成功
@pytest.mark.parametrize('data', [1, 2, 3])
def test_pass(data):
    assert func(data) == 4
复制代码
E:\workspace-py\Pytest>pytest -k pass test_sample.py
========================================================================== test session starts ==========================================================================
platform win32 -- Python 3.7.3, pytest-6.0.2, py-1.9.0, pluggy-0.13.0
rootdir: E:\workspace-py\Pytest
plugins: allure-pytest-2.8.18, cov-2.10.1, html-2.1.1, metadata-1.8.0, rerunfailures-9.1, xdist-2.1.0
collected 4 items / 1 deselected / 3 selected
test_sample.py FF.                                                                                                                                                 [100%]
=============================================================================== FAILURES ================================================================================
_____________________________________________________________________________ test_pass[1] ______________________________________________________________________________
data = 1
    @pytest.mark.parametrize('data', [1, 2, 3])
    def test_pass(data):
>       assert func(data) == 4
E       assert 2 == 4
E        +  where 2 = func(1)
test_sample.py:11: AssertionError
_____________________________________________________________________________ test_pass[2] ______________________________________________________________________________
data = 2
    @pytest.mark.parametrize('data', [1, 2, 3])
    def test_pass(data):
>       assert func(data) == 4
E       assert 3 == 4
E        +  where 3 = func(2)
test_sample.py:11: AssertionError
======================================================================== short test summary info ========================================================================
FAILED test_sample.py::test_pass[1] - assert 2 == 4
FAILED test_sample.py::test_pass[2] - assert 3 == 4
=============================================================== 2 failed, 1 passed, 1 deselected in 0.17s ===============================================================
固件
固件(Fixture)是一些函数,pytest 会在执行测试函数之前(或之后)加载运行它们。
我们可以利用固件做任何事情,其中最常见的可能就是数据库的初始连接和最后关闭操作。
1、Pytest使用pytest.fixture()定义固件,为了在实际工程中可以更大程度上复用,我们更多的是使用文件conftest.py集中管理固件(pytest会自动调用)。
# conftest.py
import pytest
@pytest.fixture()
def data():
    return 3
# 测试成功
def test_pass(data):
    assert func(data) == 4
复制代码
E:\workspace-py\Pytest>pytest -k pass test_sample.py
========================================================================== test session starts ==========================================================================
platform win32 -- Python 3.7.3, pytest-6.0.2, py-1.9.0, pluggy-0.13.0
rootdir: E:\workspace-py\Pytest
plugins: allure-pytest-2.8.18, cov-2.10.1, html-2.1.1, metadata-1.8.0, rerunfailures-9.1, xdist-2.1.0
collected 2 items / 1 deselected / 1 selected
test_sample.py .                                                                                                                                                   [100%]
==================================================================== 1 passed, 1 deselected in 0.05s ====================================================================
2、Pytest 使用 yield 关键词将固件分为两部分,yield 之前的代码属于预处理,会在测试前执行;yield 之后的代码属于后处理,将在测试完成后执行。
# conftest.py
import pytest
@pytest.fixture()
def db():
    print('opened')
    yield
    print('closed')
# 测试成功 def test_pass(db): assert func(3) == 4
E:\workspace-py\Pytest>pytest -s -k pass test_sample.py
========================================================================== test session starts ==========================================================================
platform win32 -- Python 3.7.3, pytest-6.0.2, py-1.9.0, pluggy-0.13.0
rootdir: E:\workspace-py\Pytest
plugins: allure-pytest-2.8.18, cov-2.10.1, html-2.1.1, metadata-1.8.0, rerunfailures-9.1, xdist-2.1.0
collected 2 items / 1 deselected / 1 selected
test_sample.py opened
.closed
==================================================================== 1 passed, 1 deselected in 0.02s ====================================================================
3、为了更精细化控制固件,pytest使用作用域来进行指定固件的使用范围。
在定义固件时,通过 scope 参数声明作用域,可选项有:
unction: 函数级,每个测试函数都会执行一次固件(默认值);
class: 类级别,每个测试类执行一次,所有方法都可以使用;
module: 模块级,每个模块执行一次,模块内函数和方法都可使用;
session: 会话级,一次测试只执行一次,所有被找到的函数和方法都可用。
# conftest.py
import pytest
@pytest.fixture(scope='function', autouse=True)
def func_scope():
    pass
@pytest.fixture(scope='module', autouse=True)
def mod_scope():
    pass
@pytest.fixture(scope='session')
def sess_scope():
    pass
@pytest.fixture(scope='class')
def class_scope():
    pass
  # 测试成功
  @pytest.mark.usefixtures('sess_scope')
  def test_pass(class_scope):
      assert func(3) == 4
E:\workspace-py\Pytest>pytest --setup-show -k pass test_sample.py
========================================================================== test session starts ==========================================================================
platform win32 -- Python 3.7.3, pytest-6.0.2, py-1.9.0, pluggy-0.13.0
rootdir: E:\workspace-py\Pytest
plugins: allure-pytest-2.8.18, cov-2.10.1, html-2.1.1, metadata-1.8.0, rerunfailures-9.1, xdist-2.1.0
collected 2 items / 1 deselected / 1 selected
test_sample.py
SETUP S sess_scope
SETUP M mod_scope
SETUP C class_scope
SETUP F func_scope
test_sample.py::test_pass (fixtures used: class_scope, func_scope, mod_scope, sess_scope).
TEARDOWN F func_scope
TEARDOWN C class_scope
TEARDOWN M mod_scope
TEARDOWN S sess_scope
==================================================================== 1 passed, 1 deselected in 0.02s ====================================================================我们可以把固件作为入参,还可以使用@pytest.mark.usefixtures('class_scope'),或者指定autouse参数让固件自动执行。并且还可以指定params参数来实现固件的参数化,以及指定name参数来修改固件名。
可以使用 -s 选项,显示print打印信息
可以使用 --setuo-show 选项,显示详细的固件信息
4、内置固件:
tmpdir & tmpdir_factory:用于临时文件和目录管理,默认会在测试结束时删除。
pytestconfig:用于读取命令行参数和配置文件
capsys:用于捕获 stdout 和 stderr 的内容,并临时关闭系统输出。
monkeypath:用于运行时动态修改类或模块。
recwarn:用于捕获程序中 warnings 产生的警告
作者:天道酬勤
原文链接:https://www.cnblogs.com/leozhanggg/p/14035202.html
- 0.00 查看剩余0%
- 【留下美好印记】赞赏支持

热门文章
最新讲堂
- 推荐阅读
- 换一换
- 软件测试基础知识:软件的概述——软件测试圈09-11软件的概述 1、软件生命周期 先来了解软件生命周期的全过程: 下面对软件生命周期各个过程进行逐一解析: (1)问题定义:由软件开发方与需求方共同讨论,主要确定软件的开发目标及其可行性。 (2)需求分析:对软件需求进行更深入的分析,划分出软件需要实现的功能模块,并制作成文档。(需求分析说明书) (3)软件设计:在需求分析结果的基础上,对整个软件系统进行设计,包括系统框架设计、数据库设计等。(概要设计、详细设计) (4)软件开发:在软件设计的基础上,选择一种编程语言进行开发。 (5)软件测试:软件开发完成后对软件进行测试,以查找软件设计与软件开发过程中存在的问题并加以修正。 ...

- 在数字化时代,数据已经成为银行的重要资产,而数据治理则是确保数据质量、安全性和可用性的关键。那么,什么是银行数据治理?为什么我们需要银行数据治理?又如何进行有效的银行数据治理呢?又有哪些数据治理技术及其在银行领域的实际应用呢?本文将为您一一解答。 1.什么是银行数据治理? 银行数据治理是一种对银行数据进行全面管理的过程,包括数据的收集、存储、处理、分析、使用和销毁等各个环节。它涉及到数据的质量管理、安全管理、隐私保护、合规性等多个方面,旨在确保数据的完整性、准确性、一致性和安全性,从而提高数据的可用性和价值。 2.为什么需要银行数据治理? (1)提高数据质量:通过银行数据治理,可以...
-
- Postman Tests 简介:初学者指南02-28Postman不仅是一个强大的 API 开发工具,它还提供了创建自动化测试脚本的能力,这些脚本可以用于检验API请求得到的响应是否符合预期。这些测试脚本被称为 “Tests”,支持使用 JavaScript 编程语言进行编写,并且 Postman 提供了一系列的断言库来帮助你检查包括但不限于状态码、响应内容以及响应时间在内的响应数据。 创建并运行这些测试脚本的过程分为几个步骤: 创建新的API请求 首先,启动 Postman 应用并新建一个 API 请求。在请求设置界面的顶部导航中,找到并点击 "Tests" 标签。此处提供了一个编辑器,允许你输入和编辑 Java...
- 为什么测试自动化无法取代手动测试?——软件测试圈11-04你不能指望测试自动化执行测试人员完成的所有工作。一个好的测试人员有责任找到无法自动化并找到问题的区域。 测试自动化最近受到了很多关注。当今世界的许多开发人员和测试人员更愿意寻求测试自动化的帮助,以使他们的生活变得轻松。但是,测试自动化无法完全取代手动测试。因此,我们不能假设测试自动化正在窃取全世界软件测试人员的工作。 对于不是来自技术背景的人来说,测试自动化可以被视为一种完美的解决方案。导致软件工程师自动化测试的主要原因之一是它能够节省时间。自动化流程可以为您完成一些任务,帮助您保持高枕无忧。如果您不想处理与更频繁和长时间运行的流程相关的麻烦,那么测试自动化将是您可以使用的完美解决方案...
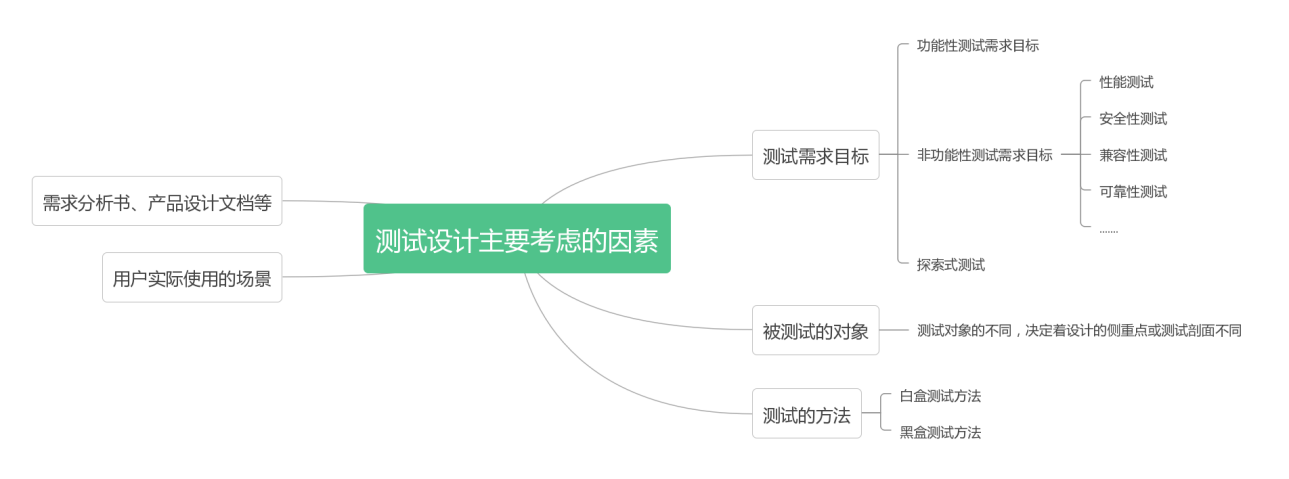
- 一、正确认识测试设计 测试设计是从特定的测试依据中得到用例,用于实现特定测试覆盖的方法。上面中的测试依据指的是有关测试的信息,比如项目背景、业务需求、领域知识、团队、进度、预算、风险等等,这些因素在经过测试分析后就是特定的测试依据,它们影响着测试设计与执行。测试设计是测试整个过程的总纲,通常是测试人员的测试思路的体现。在测试界中,有着测试设计是测试的灵魂,也是测试人员的必修课之说。 二、测试设计的原则及要考虑的因素 在测试过程中,测试人员不可能穷举所有的测试场景或组合,因此在设计测试用例时,要学会抓住测试的要点或关键点,做合理的取舍,这些要点或关键点需要进行充分分析与设计,以达到理想...
-


问题定义:由软件开发方与需求方共同讨论,主要确定软件的开发目标及其可行性。 (2)需求分析:对软件需求进行更深入的分析,划分出软件需要实现的功能模块,并制作成文档。(需求分析说明书) (3)软件设计:在需求分析结果的基础上,对整个软件系统进行设计,包括系统框架设计、数据库设计等。(概要设计、详细设计) (4)软件开发:在软件设计的基础上,选择一种编程语言进行开发。 (5)软件测试:软件开发完成后对软件进行测试,以查找软件设计与软件开发过程中存在的问题并加以修正。 ...&url=http://quan.51testing.com/pcQuan/pages/artDetails.html?artId=146478&content=utf-8&sourceUrl=http://quan.51testing.com/pcQuan/pages/artDetails.html?artId=146478&pic=http://quan.51testing.com/ueditor/php/upload/image/20230911/1694420714953883.jpg)
- 关于我们 联系我们 版权声明 广告服务 站长统计
- 建议使用IE 11.0以上浏览器,800×600以上分辨率,法律顾问:上海兰迪律师事务所 项棋律师
- 版权所有 上海博为峰软件技术股份有限公司 Copyright©51testing.com 2003-2024, 沪ICP备05003035号
- 投诉及意见反馈:webmaster@51testing.com; 业务联系:service@51testing.com021-64471599-8017

- 51testing软件测试圈微信