- 基于HTTP协议的API接口测试——软件测试圈
一、接口组成:请求+返回
接口请求=请求的URL+请求头(User-Agent、Content-Type) +请求方法(GET/POST/PUT/DELEte)+请求参数(拼接在URL后面/请求的body中)
二、接口测试关注点

三、postman测试接口
1、postman模拟接口请求:
collections:存放单个测试接口
动态变化部分引用变量:如,测试环境{{server_ip}}、{{token}}等

2、测试环境env配置:
配置环境路径,key-value方式,后面测试时直接使用该env,更换测试环境也只用调整value,或者保存多个环境信息,直接切换对应env即可

3、postman加载外部数据驱动文件:
定义外部数据文件,后缀.csv或.json
如果是csv文件,第一行为变量名,后面2...N定义变量值(每一行是一个case)
注意:变量名和值一一对应
case_desc:测试点描述;
arg:接口请求的参数名称;
4个通用的测试点预期检查,定义为response_code,response_message,errCode,errMsg。

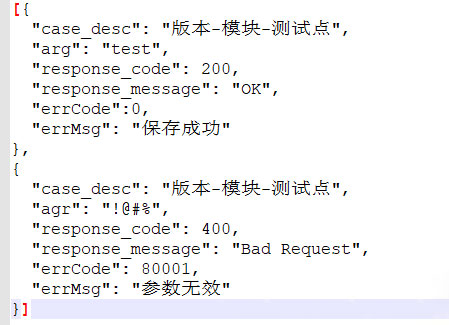
如果是json文件,写成数组,数组的每一条json串就是一个case,其中key是变量名,value是变量值
case_desc:测试点描述;
arg:接口请求的参数名称;
4个通用的测试点预期检查,定义为response_code,response_message,errCode,errMsg。

4、加载外部数据文件
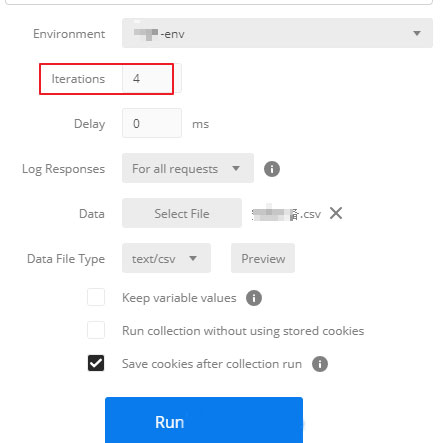
通过Collection Runner加载外部数据文件,点击collection的【Run】按钮,进入Runner界面;
迭代次数Iteration(可以理解为case数),postman会自动加载数据文件的case数,Data处选择外部数据文件载入,点击底部的【运行】按钮执行即可。
注意:有的版本Data File Type默认为csv格式,选择csv文件文件加载即可;如果为json类型,需下拉选择为application/json类型,再加载json数据文件。


5、Tests断言:
通用断言:http状态码、message、errCode和errMsg,语法为JavaScript

try{
var jsonData = JSON.parse(responseBody)
if (data.response_code !== "")
tests[data.case_desc+ "-验证后台返回response code是否'"+data.response_code+"'(实际='"+responseCode.code +"')"] = responseCode.code === data.response_code;
if (data.response_message !== "")
tests[data.case_desc+ "-验证后台返回response message是否'"+data.response_message+"'(实际='"+responseCode.name +"')"] = responseCode.name ===data.response_message;
if(data.errCode !== "")
tests[data.case_desc+ "-验证接口返回errCode是否'"+data.errCode+"'(实际='"+jsonData.errCode +"')"] = jsonData.errCode ===data.errCode;
if(data.errMsg !== "")
tests[data.case_desc+ "-验证接口返回errMsg是否'"+data.errMsg+"'(实际='"+jsonData.errMsg +"')"] = jsonData.errMsg ===data.errMsg;
}catch(error) {
tests["模块名称-接口名称,后台返回response异常(返回"+responseCode.code+" "+responseCode.name+")"]=false;
console.log("Response为:");
console.log(responseBody);
}
responseBody:获取接口请求响应的body内容, JSON.parse(responseBody) // json字符串转化为json对象;
data:获取外部数据文件中的变量值, 通过【data.变量名】方式引用。
6、查看结果
通过【Collection Runner-Run Results】界面查看断言的结果
标记为PASS:表示实际与预期的检查一致
标记为FAIL:表示实际与预期的检查不一致
作者:小小小羊羊羊
原文链接:https://blog.csdn.net/young_gril/article/details/103905263
- 0.00 查看剩余0%
- 【留下美好印记】赞赏支持
- 推荐阅读
- 换一换
- 有效杀虫的前提是掌握用例的维护和更新方法06-24基本上测试过程中有效的找bug都要依赖测试用例,新同学了解功能点也离不开用例的执行。但是用例并不是从一开始就很完美,是需要经过多个版本更新之后还能经得住考验,那就离不开我们每一个人的维护,去其糟粕取其精华。测试用例的组成成分和维护方法:测试用例的组成成分:测试用例由测试目的,测试步骤,预期结果,测试结果组成。测试结果包括:pass通过,fail未通过,n/a无效;测试用例还需要统计通过率,失败率,无效率。—————————————————————————————————————————————测试用例的维护方法:一般的公司维护测试用例是用excel,表格上附上历史修改记录,每个版本测完之后用例...

- 如何初步定位问题时前端还是服务端的?07-11web页面问题定位:第一步:前后端判断先判断是前端还是后端的问题,如果是接口请求响应数据是正常的,则进一步定位前端问题。前端问题可以通过F12打开调试模式,切换到source 页面进行查看是否是js文件内的语法错误,或者是资源文件位置未找到等问题第二部:后端具体原因分析后端接口请求异常,则可通过状态码进行判断400--请求语法错误,也就是前后端语法定义不一致401--未授权403--服务端拒绝访问404--资源不存在500--服务器内部错误如果遇到磁盘满了,就需要看应用程序是否活着,如果活着则返回500(服务器处理异常),若是应用程序已经死了,则返回400资源不存在了app端和服务端问题定位:...
- Robot Framework常用三方库及API05-181. Selenium2Library库(浏览器&页面元素操作) 1)打开浏览器Open Browser 示例:Open Browser http://baidu.com Chrome 2)跳转到指定RUL地址Go To 示例:Go To http://baidu.com 3)点击元素Click Element 示例: Click Element id=Main Click Element xpath=//div[@id="d...
- 新浪科技讯 北京时间1月16日晚间消息,据报道,微软正考虑对旧金山人工智能(AI)研究公司OpenAI投资100亿美元。分析人士称,这笔潜在交易有可能成为人工智能新时代的决定性交易。 如果微软对人工智能技术深远影响的押注是正确的,那么这笔交易还可能引发人工智能世界的一场重组,因为其他科技公司也竞相在“生成式人工智能”(Generative AI)的新领域争夺自己的位置。 上个月,OpenAI因为推出了一款智能聊天机器人系统ChatGPT而成为了全球关注的焦点。ChatGPT是一套人工智能系统,可以回答问题,并用听起来十分自然的语言生成文本。 ChatGPT很快就得到了微软的关注。微软...
-
- 常用的WEB架构开发语言——软件测试圈12-07框架是Web架构开发中必不可少的工具,不仅可以提高开发效率,还能让开发项目更成熟,并且可以提升代码的可再用性,Web框架开发离不开相应的开发语言,以下是常用的Web架构开发语言:1、Node.jsNode.js是运行在服务器端的非阻断、异步I/O、事件驱动的JavaScript,是基于ChromeJavaScript运行时建立的一个平台,可以实现js在服务器端的编译,而且拥有更好的组织代码,提升复用性,非常适合在分布式设备上运行数据密集型的实时应用。2、PHPPHP是Web架构开发常用语言,PHP开发了很多Web框架,如Zendframework、CakePHP、ThinkPHP等,PHP独特...
- 关于我们 联系我们 版权声明 广告服务 站长统计
- 建议使用IE 11.0以上浏览器,800×600以上分辨率,法律顾问:上海兰迪律师事务所 项棋律师
- 版权所有 上海博为峰软件技术股份有限公司 Copyright©51testing.com 2003-2024, 沪ICP备05003035号
- 投诉及意见反馈:webmaster@51testing.com; 业务联系:service@51testing.com021-64471599-8017

- 51testing软件测试圈微信

